
Central vacuum installation for new construction
In a house that is still being built, a central vacuum is planned in alongside the other systems the home is getting. The drawing below is the finished system, and the three moments of the build beside it read it one part at a time.
One drawing, read three times
- Before framing
Planning
A system starts on the floor plan. We go through it with you: where the power unit can stand, which walls the inlets belong on, and how the tubing gets from one to the other. Every project runs its own way, so yours is looked at on its own terms, you get a free estimate, and the timing is agreed with you and with the build.
On the drawing- 1Power unitThe spot is chosen on the plan: a garage, a basement or a utility room, out of the rooms the house is being finished for.
- 2Inlet locationsMarked floor by floor, so the hose reaches comfortably around each one and the rooms you use most are covered.
- 3Tubing routeThe path from each inlet back to the unit is drawn while the walls are still lines on the plan, so the route and the framing are planned together.
- Walls open
Rough-in
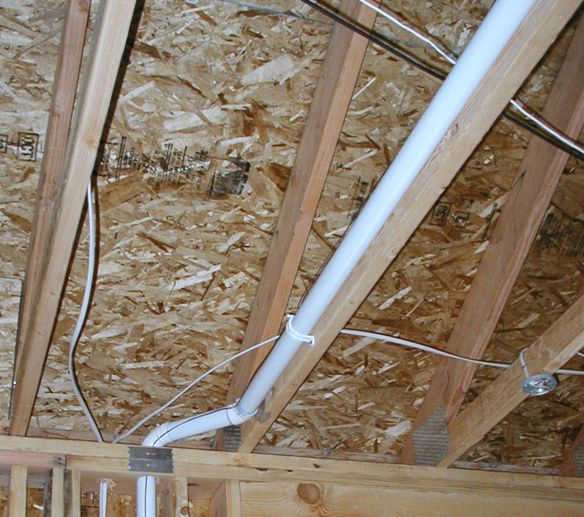
Once the framing is up and before the walls are closed in, the system itself goes into the house. The tubing runs from the power unit out to every inlet location marked on the plan, and the electrical work the system needs is ours too, put in along the same route. When that happens is agreed with you and with the build, because every project sets its own order.
On the drawing- 1Trunk lineThe main run out of the power unit. Everything the system picks up travels back along it.
- 2Branch runsA separate run drops off the trunk to each inlet location, ending at the wall where that inlet will sit.
- 3Vertical runOne run between the floors, so the levels above and below are on the same system.
- After drywall
Trim-out
Once the walls are finished, the system is completed and started up. The power unit is mounted and connected where the plan put it, and every inlet gets the small cover you will open when you clean. From then on those two are the whole of the system you see.
On the drawing- 1Power unitMounted, connected and running in the spot chosen on the plan. From then on it stays put.
- 2Inlet coverA small hinged cover finishes each inlet, closed when you are not cleaning and open when you are.
- 3Behind drywallEverything between the two is inside the walls, so the finished rooms keep their space.
What goes into the house
A finished system is four things: the unit that does the work, the tubing that connects the house to it, the inlets you plug into, and the hose and accessories you clean with. The first three are built into the home. The last is the part you pick up, and it comes with the system.
- Power unit
- The motor and the canister that collects everything, in one unit. It stands in the garage, the basement or a utility room, wired in and connected to the tubing that leaves it.
- In-wall tubing
- The pipe that links every inlet back to the unit. It goes in while the walls are open and stays inside them afterwards, out of the finished rooms.
- Wall inlets
- The valve in the wall the hose plugs into, behind a small hinged cover. Open one, and the suction is there.
- Hose and accessories
- The part you actually hold: the hose, the power head and the tools that clip onto it. They come with the system.
Coverage is planned around the way you clean
There is no standard layout for this, because there is no standard house. What sets the coverage of a system is the hose length you would rather handle and how the rooms are actually going to be used, floor by floor. So we ask about that first, listen to what you want out of the system, and then recommend where the inlets belong on your plan. That conversation is what the free estimate is for.
Get a free in-home estimate
Tell us a little about your home and what you need: a new install, a system for an existing home, Hide-A-Hose, or a repair. We'll follow up to schedule your free estimate and give you honest, straight answers. Prefer the store? We do free in-store estimates too.
Prefer to talk? Call our Warrenton store at (540) 351-6060
Free · No obligation · Local experts since 1995